Lesson 2: Build and Publish a Simple Bot
Estimated reading time: 20 minutes
After brainstorming ideas and planning your chatbot for "Monoco Fashion Shop", in this lesson, you will learn how to build a simple chatbot like lesson 1 based on the flowchart that you have planned.
Review the flowchart of "Monoco Shop" chatbot (back to lesson 1 if you want to learn how to design a chatbot flowchart) before building chatbot together:

Create a blank bot
Go to BotStar App and click on Create a New Bot and Clone Blank bot

Enter bot name, set other fields and click on Create Bot

Here's the Flow Editor of the blank bot where you can start building your chatbot for Monoco Shop from scratch:

Design a basic bot flow
After cloning a Monoco Fashion template in the previous lesson, you have already had an overview of this bot, now you will learn how to design a chatbot like this. Follow step-by-step instructions to learn how to create a simple chatbot for fashion shop from scratch:
Drag and drop blocks
Personalise your "Welcome message" and the "Main menu"
In this part, you'll build the "Welcome message" to greet your customers and "Main menu" to navigate your customers to the designed bot flow for Monoco Shop as the flowchart below:

Drag and drop a Text Block into Flow Editor and type in the welcome message. You may insert variables to personalize your welcome message

Add Image Block to insert your logo or any image of your fashion store

Use the connectors to connect between two blocks to direct users from Text Block to Image Block. If you want to set conditions for a connector, click on Add condition button

Next, drag and drop Buttons List to create "Main Menu". The conversation flow can be divided into three categories:
- Sales (Go shopping)
- Support (Navigate the location)
- Contact admin

Let's review what you've done:

Test the bot flow on Preview

Showcase list of products or services
When you are building a chatbot for "Monoco Fashion Shop", you want to showcase the clothing items. This part will guide you to do this using Horizontal List:

Drag and drop Horizontal List into Flow Editor and upload images, set the price and write the description for the list of fashion items, including three categories: T-shirts, Skirts, Dresses. Then add the buttons to order a fashion item

Good job! Test the "Go shopping" button on Preview and it shows the beautiful list of fashion items

Ask customer delivery information
In this part, you will learn how to ask customer information (such as email address, phone number, delivery address, etc.) to deliver the fashion items in the right place at the right time:

To deliver the clothing items to the right customers, you need to ask their contacts, we will guide you to ask your customers'email addresses using Text Block and setting up Quick Response as shown below
Add a "Text Block" and click on "Static"

Select "Email" for a quick response if you want to detect the user email address automatically. In case, you want your customers to type their email addresses, you can skip to set up a quick response

Next enable Expect User Response to save user's response. If you want your customers to type in the correct response, ultilize Validation Error Message

Continue to create other blocks to collect user delivery information as you expect

Well done! Now test this bot flow on Preview

Schedule an appointment
After your customer orders a fashion item, you need to schedule an appointment to deliver this item. We will show you how to make an appointment with your customers using WebView.
Click on a "Button" and select "Open Webview", choose "Date" or "Date and Time" and "Date Format" to open Webview as a calendar to schedule an appointment

Test on Preview and you can schedule an appointment with your customers

Navigate customers to your store in Google Map
After supporting your customers to order fashion items, now you can help them find your stores in case they want to try and buy the clothing items directly in your stores. In this part, you will learn how to help your customers get directions to Monoco Shop in Google Map:

Use Buttons to "Open Webview", select "Custom URL" and insert Web URL to navigate customers to Monoco Fashion Store

Done! Test on Preview to see the result

When clicking on the button, it will redirect your customers to Google Map to find the Monoco fashion stores

Organize bot flow
Use Module to group related blocks
When building a chatbot for Monoco Shop, it contains many blocks and it is not easy to edit and improve your chatbot. In this part, you will learn how to group some related blocks using Module. It helps you organize your chatbot for the fashion shop better.
Follow these following steps to create a Module "Customer Information" to collect customers'information, including Name, Email address, Phone, etc. to optimize your chatbot flow:
1. Drag and drop Module in Advanced Blocks into Flow Editor.

2. Click on View Module, you'll jump into a Module "Customer Information". Then start designing a chatbot flow to collect customer's information

Use Add Module Outlet to exit from a parent module
Make your chatbot flow for Monoco Fashion Shop much more flexible and dynamic using Module Outlet. You can connect blocks inside a module with any blocks/modules within your bot flow.
After ordering women's fashion clothing, your customers will have two options:
- Receive via shipping
If your customers choose this option, you will navigate them to other blocks to ask their delivery information
- Buy at the store directly
If your customers choose this option, you will redirect them to "Module Location". In this case, use "Module Outlet" to exit from "Module Shopping" to "Module Location"

Then connect to "Module Location" to redirect your customers to get direction to your stores.

Test "Module Outlet" on Preview and you will see that you can exit from "Module Shopping" to "Module Location" as shown below:

Some useful tips for you:
- You can enable "Capture User Response" and use "Checkpoint" to manage user data easily
- You can copy-paste a Module or a Block from a Module to another Module
- If you copy a Block or Module to another Module, keep in mind that you can use tab "Outline" to locate a copied Block / Module
Set default responses
After designing a conversation flow for Monoco Shop, in some cases, your customers do not follow this predefined flow, so your chatbot cannot understand customers’ demand. In this case, you need to set up a default fallback block to automatically reply when the bot cannot respond.
When your customer types anything like "I'm joking", the bot doesn't understand the meaning of this sentence, so the bot will show the default message that you've set up already. We would recommend that you should set up a fallback block with two options: "Back to Main Menu" to continue the conversation and "Chat with human" to talk with shop assistants directly.
The expected result might look like this:

To set up a fallback block for what bot don’t know as above, in the Flow Editor, create a default fallback block to show your customers a message whenever bot doesn't understand and cannot satisfy customers’ demand.

Go to Configuration > Behaviors, enable Auto fallback when bot cannot respond, choose "Fallback Block"

Note: Are you afraid of a boring and stupid chatbot? Don't worry! You can learn how to train your chatbot to become smarter in lesson 5 by using our Keyword feature. Just keep learning and enjoy the course! 😄
Avoid dead-end flow
After customers order clothing items, the conversation is coming to a dead-end. Follow these steps to keep a conversation going:
Go to Settings > Behaviors > Enable Assist user navigating upon dead-end message, set up a Quick Response and choose a Fallback Block. You can choose a block "Main Menu" to navigate your customers to Main Menu and continue the conversation.

Good job! Take a look at the result after setting up to avoid dead-end conversation:

Create a bot menu
When your customers lose direction in "Monoco Fashion Shop" bot flow or they want to navigate the conversation proactively, in this case, you need to set up a "Bot Menu" for them to redirect the conversation to continue to discover fashion shop. Here's what it looks like on Facebook Messenger:

To create a Bot Menu, click on Toggle Menu Visibility symbol, then use connectors to connect to other Blocks or Modules ("Module Shopping" and "Chat with staff") to navigate the conversation

Preview your bot
After building a chatbot for Monoco Shop, test on Preview carefully and improve your chatbot before publishing it to create a smooth chatbot conversation:

Tip: Re-arrange blocks and do not let the connectors overlap to make your chatbot flow clearer.
Publish your bot
After following these steps above to build a simple chatbot for Monoco Shop, now you can publish it on Messenger or/and Website to start engaging your customers.
On Messenger
Before publishing your chatbot on Messenger, make sure that you have already had a Facebook Fanpage Messenger "Monoco Shop" and give BotStar the required permissions to access your Page. If you don't know how to create a Facebook Fanpage, please back to our lesson 1
Your resulting chatbot on Messenger might look like this:

Follow these steps to publish your bot on "Monoco Shop" page:
Go to your chatbot and click on Publish your Bot button in the upper right corner

Click on Connect (or go to Bot Builder > Publishing Configuration > Messenger) then select "Monoco Shop" page and click on Assign button

Click on Publish button to publish your chatbot on Messenger. If you edit anything in your chatbot flow, click on Update to update any change

Please keep in mind that chatbot cannot be deployed on the same "Monoco Shop" Facebook page. In case the bot has been connected to a Facebook Page, you must Unassign before re-connecting and re-publishing your chatbot

For more information, please visit Connect Your Chatbot To Facebook Messenger
On Website
Before continuing this part, make sure that you have already had a "Monoco Shop" website to publish your chatbot. If you don't have one, just read our lesson 1
Visit Publish chatbot to Website to have general knowledge about publishing on the Website and some configurations before starting. This part will guide you to publish your chatbot on "Monoco Shop" website using Wix site as you have created in lesson 1, follow the instructions below:
1. Go to Connect > Website, add at least one Website to Whitelisted Domains that you want to publish your chatbot. Please save and publish your chatbot again

2. Copy the code snippet

3. Go to Settings in your site's dashboard, then click the Tracking & Analytics tab under Advanced Settings:
![]()
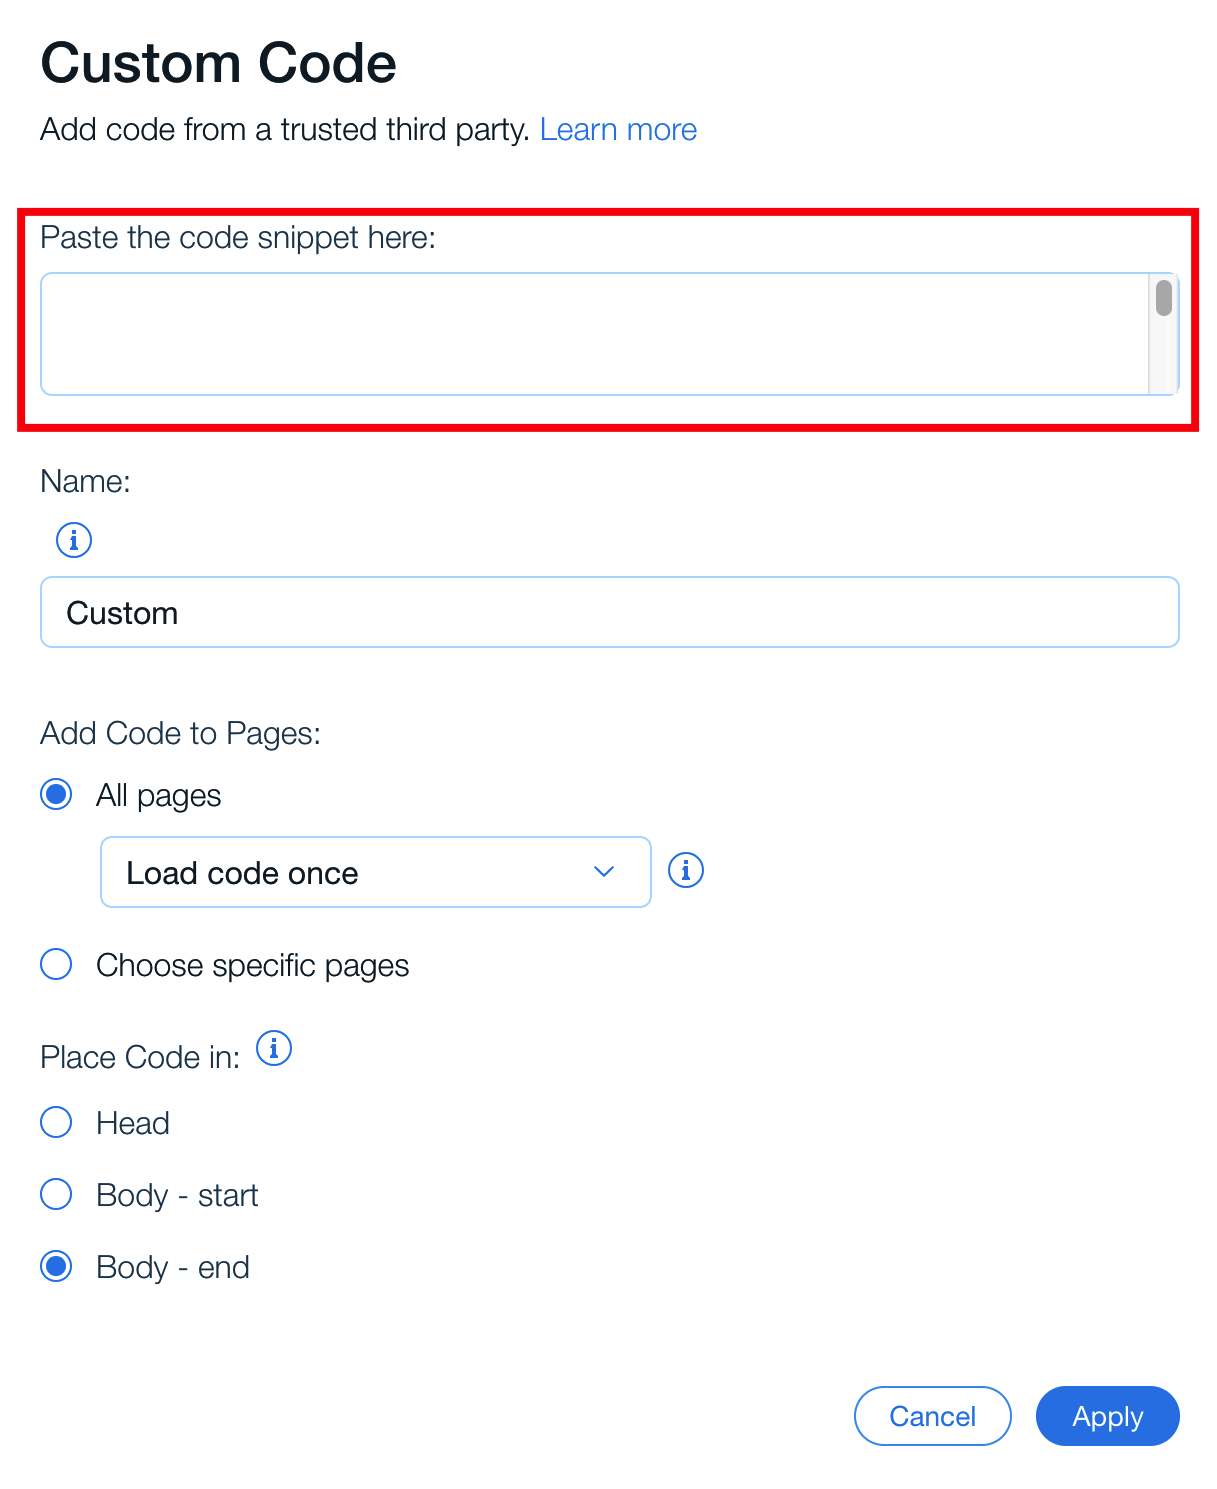
4. Click on + New Tool and select Custom from the dropdown:

and paste the code snippet, then press on Apply or Update (if you want to update the code)
5. Click on Publish button to publish the change. Here's the result of Monoco Shop chatbot after publishing on Website:

Also, you can customize bot branding and color as shown below:
Go to Publishing Configuration > Website > Appearance, fill in "Custom Name", change "Theme Color" and upload an avatar as you expect and click on Save

Do the same steps to publish your chatbot on the Website as above. Here's the result after customizing bot branding:

Note: Please keep in mind that you will need to upgrade your account on Wix to be able to publish the chatbot.
Just take a Wix website as an example to illustrate, here are some articles to publish your chatbots to other website platforms:
- Integrate Chatbot with WordPress
- Integrate Chatbot with Webflow
- Integrate Chatbot with Weebly
- Integrate Chatbot with Shopify
- Integrate Chatbot with Squarespace
Congratulations! 🎉
After this lesson, you can build a simple chatbot for Monoco Fashion Shop. Is it so simple to build a basic chatbot, right? In the next lesson, you will learn how to optimize your conversation.
If you have any concerns, please feel free to leave a comment below or contact us through support@botstar.com. For more details on how we have helped our customers grow their business, you can view our use cases, blogs or join our BotStar community to learn and share new things 😊