Integrate your chatbot with Google Sheet
It got much easier - now you can connect your existing Google Sheet account to BotStar without using any third-party apps. To be specific, this feature allows you to search, access and edit data in the spreadsheets within your Google account automatically.
Take a look at this document to learn how to connect your BotStar Account to Google Sheets, and transfer your user’s data back and forth without a single line of code.
Connect BotStar to your Google Sheet account
1. Prepare a speadsheet
To use this feature, you must have a spreadsheet in your Google Sheet account first.
Head to your Google Sheet account, create a worksheet with column names on the first row of the document.
Note: The spreadsheet should be created in its final version before you enable integration. If you want to change the structure of your spreadsheet/worksheet in the middle of the setting process, you must go to your Google Sheets Action and reload the chosen Spreadsheet and Worksheet fields.
2. Connect your Google account
After creating/checking your worksheet, let's go back to the flow and connect your Google account to BotStar to use the Google Sheets Integration.
Head to Bot Builder > Integrations and scroll down a bit to find Google Sheet Integration section > toggle it on and click Connect. You will be asked to integrate your google account. Make sure to connect to the correct Google account that will use the spreadsheet.

3. Connect your Google Spreadsheet
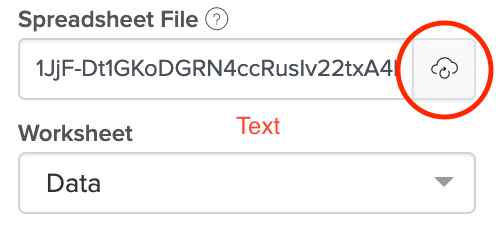
After connecting your Google account, you need to get your speadsheet ID to connect to BotStar. To get the ID, open your Google Sheet file, and copy the ID from the URL.

Paste the ID into the Spreadsheet ID field in BotStar and press the sync icon to load the worksheets in the spreadsheet.
4. Select Google Sheet actions
Jump to our visual builder after you complete the integration step, you can choose what actions to perform every time a reachable user interacts with a bot.
Update: send data out to Google Sheets, or edit data in the spreadsheets within your Google account.
Query: search, access, retrieve data and bring it in (from Google Sheets) to your bot.
Drag and drop action Update/ Query Google Sheet in the bot flow based on your use case. You can now easily send data out to Google Sheet or retieve data from Google Sheet file to your chatbot.
Add a new row in a sheet
This action sends data collected by BotStar to your spreadsheet. When your chat user passes through this flow, their data will be pushed to your Google Sheet file and displayed in a new row.
1. How to setup
Drag and drop action Update Google Sheet block in the bot flow.
Select the Spreadsheet & the Worksheet: Select from the drop-down the spreadsheet you want to connect with this Google Sheet Update block, as well as the specific worksheet where the new data will be saved in.
Select the action Add a new row
Field Mapping: Define what information will be sent to what column in your worksheet. You must determine what data collected by your bot will be sent to Google Sheets by mapping data fields (column in your worksheet) with the data saved in your BotStar bot.
Outcome
The chosen data will appear in your Google Sheet file automatically once you set it up!
2. Example
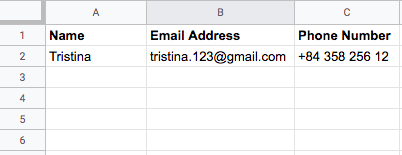
In the following example we'll show you how we automate sending data collected by bot to fill in a basic lead form in Google Sheet. To be specific, in the conversation with bot, we will ask for our customer's name, their email and finally their phone number then will send all of these data to Google Sheet.
Here is how our spreadsheet looks like:

Next, we design bot flow to collect targeted information. If customer responses to these questions, their answers will be saved as user responses {response.name}; {response.email}; {response.phone} in bot.
These are the data we will use to send out to Google Sheets in the next Data Mapping step.

Drag and drop Update Google Sheet block in the bot flow (remember to enable integration first), choose the Spreadsheet and the Worksheet and action Add a new row.
We have one file named Customer data in our Google Sheet account. All of contact information will be saved in the worksheet named Customer Info, thus, we input these spreadsheet and worksheet in the setting fields.
Finally, match user responses saved in bot to your worksheet fields. This is how the setting looks like:

Now you can test your flow, and then chosen data will appear in your worksheet. This is how the conversation will look like from the user's point of view:

Result
This is what we have in our Google Sheet file:
Update a matching row in a sheet
This action allows you to update the information in a Google Sheet you had already filled before using a column and a correspondent value as the matching condition.
1. How to setup
Drag and drop action Update Google Sheet block in the bot flow.
Select the Spreadsheet & the Worksheet: Select from the drop-down the spreadsheet you want to connect with this Google sheet block, as well as the specific worksheet where the data will be saved in.
Select the action Update matching row.
Set up the Matching condition: Select the field in your worksheet (the column), and the value saved in bot as a matching condition.
Note: The spreadsheet starts looking for data based on this condition. It finds the data by searching the column from left to right, together with the row from top to bottom until it finds the matching row by value.
- Field Mapping: Define what data will be updated to what column in your Worksheet, in case it finds able value satisfying the previously Matching condition. You can perform this action by mapping data fields (Column in your Google Sheet) with the information saved in your BotStar bot.
Outcomes:
If the value you are searching for exists in a certain column of the spreadsheet: once it is done, the data saved in variables will get re-populated with the current values.
If the value you are searching for does not exist in the spreadsheet: It is not possible to update the information (since we did not find this row). You can enable Add a new row if no match found option to have these data saved in a new row (in your worksheet).
2. Example
We want to allow our users to update their information themselves from time to time, let's say email address for this example. They can also fill in their email address even in case this data hasn't added to the sheet before.
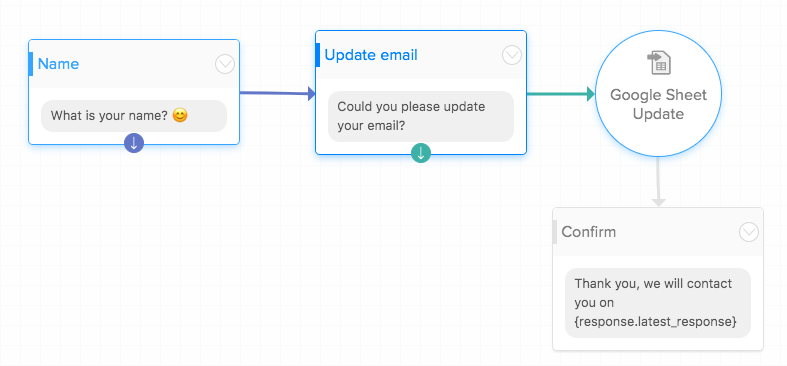
Firstly, we design the bot flow asking for username and ask them to update their email.
Then drag and drop Update Google Sheet block in the bot flow (remember to enable integration first) and start the below settings:
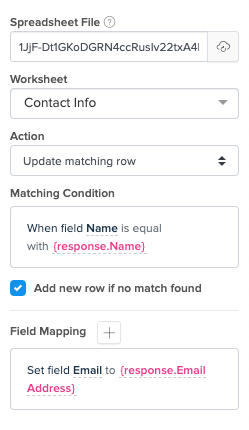
Choose your spreadsheet - Customer data and worksheet - Contact Info where you want to update with new data.
Setup Matching Condition: When the field Name is equal with {response.name} (the value which the user has just typed in). Based on the Matching Condition, it will find a row with the value saved in the {response.name} that matches the data and update the latest email address our customer has given us.
Save user’s response {response.update email} in Email Address field in Google Sheet.
This is the configuration of Update Google Sheet block.
This is how the conversation goes in user's point of view:

Result
This is our spreadsheet. Please pay attention to column Email Address, the current value was replaced by a new one.
Before:
After:

You could enable the option Add a new row if no match found just in case there is no value in your worksheet correcsponding with the Matching condition. That new Email address will be added in a new row.
Get data from Google Sheet
Our integration allows you to import data from your Google Sheet file into BotStar. Once you get the data from the spreadsheet, you can use this value as a variable in your bot for further usages.
Basically, this action works by searching a value saved as a variable in bot within the Spreadsheet, according to the value you have chosen as a reference in Data Mapping.
Refer to the instruction and example below to match to see how it works!
Note: You will use variables to set up and retrieve data from Google Sheets. If you're not familiar with BotStar variables system, please check our Variables doc 🤓
1. How to setup
Drag and drop action Query GG Sheet block in the bot flow.
Select the Spreadsheet & the Worksheet: Select from the drop-down the spreadsheet you want to connect with this Google sheet block, as well as the specific worksheet where the data will be saved in.
Set up the Matching condition: Select the field in your worksheet (the column), and the value that corresponds to the field as a matching condition.
Based on this condition, it searches from left to right (column), in the same row to get the data you want (defined in Data Mapping step) and send back to your bot.
- Data Mapping: Define what information will be sent back to BotStar If Google Sheets finds the value that satisfies the above matching condition. Select the data saved in bot as a variable and the field in your worksheet (the column) so you can get a value corresponding to this condition sent to BotStar.
Outcomes:
If the data you're searching for exists in the sheet: it will get the information and send it into BotStar. Once you get the data from the spreadsheet, you can use this value as a variable in your bot.
If the data you're searching for does not exist in the spreadsheet: it wouldn’t return anything and all variables is setup in mapping data will be reset to "empty" value.
If the data you're searching for has more than one matching value that exists in the spreadsheet: user will receive the first value it can find.
2. Example
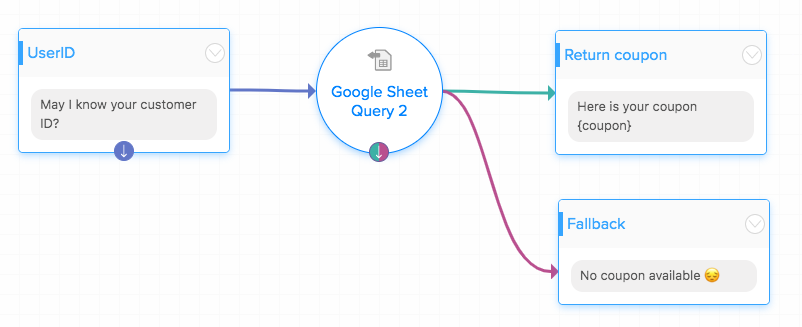
We run a promotion program by giving out a 10% discount coupon for all regular customers. Here we're going to make a flow that allows our users to check if they’re able to receive the coupon. We will ask for their user ID (customer ID) then make a request to Google Sheet. If the ID is listed in the sheet, it will send back a coupon code. If the ID cannot be found, nothing will be mapped to the user ID, we'll send the second message "No coupon available".
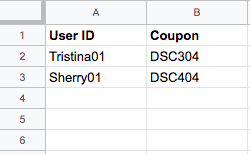
Here is the spreadsheet we have in our Google Sheet account:
First of all, we design bot flow to ask for userID. The we create a new variable named {coupon} to store coupon code retrieved from Google Sheet in Data Mapping step.
Note: we suppose you already have some understanding about variables. Forget how to use variables in BotStar? Take a look at our Variable documentation😃
Drag and drop Query Google Sheet block in the bot flow (remember to enable integration first) and follow the below settings:
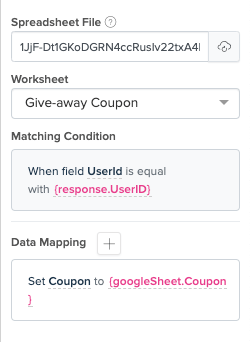
Choose your spreadsheet - Customer data and worksheet - Give-away coupon where the data you want to retrieve is stored.
Setup Matching Condition: when the field user ID is equal with variable {response.userID} which user has just typed in.
Data Mapping: Set variable {coupon} to the value we’ll get from Google Sheet Coupon column {googlesheet.coupon}.
This is how it will look in the Google Sheet Query block
Now let’s test the flow and see how it works!
This is how the conversation goes in user's point of view:

The retrieved data will be sent back and saved in variables in your bot! 😉
Automate sending coupons
If you want to provide some coupons for your customers, then it’s incredibly easy to do with BotStar Google Sheet integration.
In this example, we will show you how to connect your Google Sheet file to BotStar to build automation generating coupons flow. It will give you the ability to get a coupon from your Google Sheet file, send it back to your customers via chatbot, update the status of that coupon in the sheet to avoid repeatedly sending one coupon.
Note: you will have to perform 2 GG Sheet actions for this use case, which are Google Sheet Query and Update a matching row.
Here’s how it’s done:
- Open your Google Sheet account and create a List to put your codes for coupons in there:

Go to BotStar and create a new variable named {coupon} to store a new coupon code retrieved from GG Sheet in bot.
Create a flow using GG Sheet Query to get the code from your Spreadsheet.
In the Sheet, we list down all the code in the first column and status of them in the next column named status. Any code that’s set as “available” can be pushed back to bot and shown in the conversation with customers.
Choose your spreadsheet - Customer data and worksheet - Give-away coupon
Setup Matching Condition: When the field Status is equal with value, which means that the coupon is still available to redeem (it's not been used before)
Data Mapping: Set variable {coupon} to the value we’ll get from GG Sheet Coupon {googlesheet.coupon}

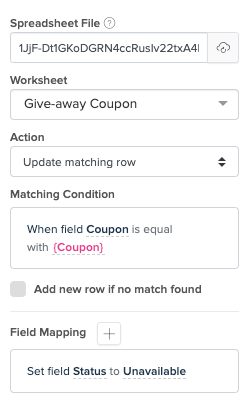
- Drag and drop GG Sheet Update block in the flow and set it up to update coupon status in your spreadsheet.
Usually, one coupon can only be redeemed one time only. Thus, when it’s able to query and send one coupon back to customers, we need to have that coupon status updated in the spreadsheet (to prevent it from being sent to other customers next time).
Please follow the below settings:
Choose your spreadsheet - Customer data and worksheet - Give-away coupon
Select action “Update a matching row"
Setup Matching Condition: When the field Coupon is equal with variable {coupon} previously saved in bot then
Field Mapping: Set the field Status (in GG Sheet file) to value unavailable.
Here is the entire bot flow:

Let's test and see how it works!
If you have any concerns, please feel free to leave a comment below or contact us through support@botstar.com. For more details on how we have helped our customers grow their business, you can view our use cases, blogs or join our BotStar community to learn and share new things 😊